quilty fun birthday party!

Happy First Birthday, Quilty Fun! Welcome to my stop on the birthday blog hop! 

Quilty Fun by Lori Holt has quickly become my go-to book for fun, scrappy patchwork designs. Seriously, I would like to make everything in this book! The book contains clear, easy-to-understand diagrams for creating the row quilt shown on the cover, plus ten additional projects ranging from pillows to runners to quilts, all using rotary cutting with no templates. 

To help celebrate the first birthday, Lori Holt has created a special, fun birthday cake block!

Mmmm chocolate layer cake. My favorite! I was so excited to print out the free pdf of this pattern's cutting instructions, and I immediately started sewing my birthday cake. But I liked it so much that I needed another piece of cake. How about a red velvet cake?

And because I have so many favorite cake flavors I just kept going! Anybody want a piece of strawberry cream cake?

Before I knew it, this happened. Twelve cakes with rainbow sprinkles sashing!

Who wouldn't love a fancy cake for Valentine's Day?

Or maybe a pretty birthday cake with fanciful buttercream rosettes?

Could I tempt you with a slice of chocolate mud cake?

Seriously, you are going to LOVE making these cakes. One would be cute as a pillow. Three would make a great birthday table runner. Or go crazy like I did and make twelve (or more)! Download the FREE copy of the Quilty Fun birthday cake pdf pattern here. You can also view all twelve of my birthday cake blocks on my Flickr page.

But don't leave yet because the birthday party is just getting started! Here are some of the amazingly fantabulous patterns in Lori's book. There's the full row along quilt that I made last year.

I loved making the Snowball Fight table runner. I really need to have this quilted before Christmas!

And the Quilty Fun book also has directions for Lori's signature bee pattern. Here I've reduced the size of the bee and made a quartet of them!

I do hope that you'll help me in celebrating Quilty Fun's first birthday. Pour yourself a nice hot (or cold!) drink, download the birthday cake pattern and start stitching!

Thanks for stopping by today. Be sure to visit the Fat Quarter Shop for a copy of the Quilty Fun book. Their blog will also have links to all the other bloggers participating in the hop. And drop by to see what Lori is working on here. I'll see you soon!


friday finish - whit!

Meet Whit!

Whit by Miss Rosie's Quilt Co. is finished! Maybe I should say that it's almost finished. After quilting, it will become a European pillow sham for my bed. To get the correct size for a pillow top, I needed to cut the border strips 2" wider than the pattern. And of course that meant that I needed to buy another 5" of background fabric. Grrrr. Luckily, Donna shipped extra fabric to me in just two days! (I could have joined my leftover fabric strips to get the right length, but I really didn't want to see the seams.) 

Whit measures 26" square. Each Flying Dutchman block is 4". I used Flower Sugar by Lecien - most of it is current season, but I tossed in some older pastel favorites, too. And for extra visual texture, I added 1/8" mini gingham from Riley Blake. I love how it coordinates perfectly with the florals. 

This was a fun quilt to make! Nice little blocks and short border strips. I usually dislike the process of pinning borders, but 26" borders - I can handle that! 

The Another Year of Schnibbles sew along is hosted by A Quilting Life and Pink Pincushion, and you can get all the details about how to join the group here

And now can I start a new quilt? I am dying to cut into my new Christmas fabrics

I'm linking up today with Finish It Up Fridays at Crazy Mom Quilts. 

flying dutchmen

Sixteen Flying Dutchman blocks are done! They're for my Little Bites "Whit" mini quilt. Why is this block called Flying Dutchman, anyway?! Wikipedia says that a Flying Dutchman is a legendary ghost ship that can never make port and is doomed to sail the oceans forever. Maybe this refers to how I felt doomed to make 128 mini flying geese forever?

I'm kidding, of course. The blocks were actually really quick and easy to construct once the geese were completed. There's nothing complicated here. Each block measures 4" finished. I was a little concerned about getting my points to match in the centers but they turned out really nicely.

It took some maniacal focus on Thursday and Friday nights to get these pieced. I spent the early part of last week in Dallas on a business trip - hence, no sewing for three days. This is an annual trip where I train and motivate a group of 75 people to sell my company's products throughout the holidays. It was quite a production, in a hotel ballroom. I had special music, snacks and decor, and I even did a costume change mid-lecture! It was hysterical, but hopefully they all learned something, too. Then I rushed back to NYC to meet with another retailer. So it was a temporary break from my normal life, but sometimes I gotta do the real job!

I'll leave you with a shot of all 16 blocks. They're ready for sashing, cornerstones and a border! A finish is coming soon!


floral flying geese

The flying geese have arrived! I've got 32 sets of 4 matching geese. They'll finish at 1" x 2". Yeah, I know. Crazy. They took longer to make than I had expected - they're super easy to make and trim with the Mini Fit To Be Geese ruler, but they're a little tedious. I also make them in color groups because then I have a feeling of accomplishment ("Yay, all the red geese are stitched!")

Ok, now that they're sewn and trimmed, I need to decide on a setting. First there is the Flying Dutchman variation. I love these. The blocks look scrappy, but they're really perfectly controlled. It does mean that my points will all need to meet in the middle correctly.

And then there are the straight rows of flying geese going in opposite directions. I really like these too! I could do them either randomly mixed up like I've shown here, or I could arrange them in an ombre rainbow setting.

So which will I choose? I'll think about it for a few days, because once I start sewing there's no unpicking!

moda modern building blocks - month 2

Howdy, everybody! I recently returned from a short trip to New Mexico (yes, again!) and immediately got back to sewing. It was exciting to find an envelope from Eric Figueroa at Fig Tree and Co crammed into my tiny mailbox. That could only mean one thing - the September fabric pack for the Modern Modern Building Blocks sampler arrived!

Last month I made one 36" block and four 6" blocks, and this month's fabric made an 18" block and four more 6" blocks. Working with Moda Bella solids is fun! I don't think that I've ever used solid fabric for blocks, so this is a bit of a stretch for me. I love that tiny coral pindot fabric from Fig Tree's recent Mirabelle collection. It adds just a bit of texture without being too overpowering. 

The Flower Sugar fabric for my Another Year of Schnibbles "Whit" pattern also arrived while I was away (I could barely open my mailbox!) and I quicky starched and cut it. Here are my fabrics, just waiting to be sewn into flying geese.

So when I wasn't sewing or blogging last week, here's what I was up to. My sister took me on a trip to New Mexico to celebrate my upcoming birthday. She's traveled around the world but never to the Southwest US! First, we visited Taos Pueblo, which has been continuously inhabited for over 1000 years and has no running water or electricity. 

And we had to have a snack at the pueblo. I love this sign. 

No running water or electricity, but they managed to find Sue Bee honey and a plastic tablecloth. That cracks me up. 

Then came a 2 1/2 mile hike in Bandelier National Monument. It's breathtaking to see caves carved out of ancient volcanic ash where primitive people made their homes. There are still traces of their artwork thousands of years later (swirls, zigzag serpents, and... people with marshmallow heads?).

We saw these sunflowers EVERYWHERE we went, growing wild and out-of-control along the highways as well as in the park.

Surely this volcanic ash home could use a nice quilt with pointy-points and heirloom quilting?

After visiting the Bradbury Museum in Los Alamos to learn about the secret mission to create atomic bombs during WWII, we then stopped at Camel Rock, just outside of Santa Fe. We joked about how silly this rock formation looks, but after driving by it 8 times we decided that we just needed to get a closer look. I think that if you look at it head-on it turns into a cobra instead of a camel, but never mind. I wouldn't want Camel Rock Casino to have to change its name!

And, of course, we spent time in Santa Fe, where the annual Fiesta was taking place. And the green chile pepper harvest was being roasted in giant rotating metal drums. We really had a great time. I got to spend time in one of my favorite locations with my favorite little sister!

friday finish - strawberry social!

It's done! The Strawberry Social top is completely assembled!

strawberry social 023.JPG
One of my all time favorite Flower Sugar prints. 

One of my all time favorite Flower Sugar prints. 

It's always an extra-good Friday when I finish a quilt top, and this is my second finish this month! I know that I say I love all my quilt tops, but I really, really love this one. I had fun sewing every single berry. I used all my favorite reds and pinks from Pam Kitty Morning, Lori Holt, Flower Sugar and Bonnie & Camille. The pink-on-white dotted background is from the Pam Kitty Picnic collection. 

The pattern is Strawberry Social by Margot Languedoc's The Pattern Basket. Her instructions are very clear and easy to understand, although the leaf portion takes a bit of concentration.

I also made my quilt larger than the pattern. I think that it's the perfect sofa size. My top contains 36 berries and measures 62" x 75" - the pattern measures 53" x 66" and has 25 berries. 

Remember the two experimental blocks? I decided that they weren't ripe enough for this quilt, and so I turned them into jam. Ha ha! I'm glad that I tried something quirky, but, um, no... just too weird. 

I love this recipe print from Lori Holt's Bake Sale collection.

I love this recipe print from Lori Holt's Bake Sale collection.

Yes, that's a strawberry covered in cherries!

Yes, that's a strawberry covered in cherries!

Thanks for taking the time to visit with me today! I'm linking up with Finish It Up Fridays at Crazy Mom Quilts. I'll check out what everybody else finished this week after lunch. And maybe dessert. A strawberry sundae? A strawberry shake? I saw strawberry cream filled Twinkies at my grocery store last night, but they scare me.

mittens with quilty fun

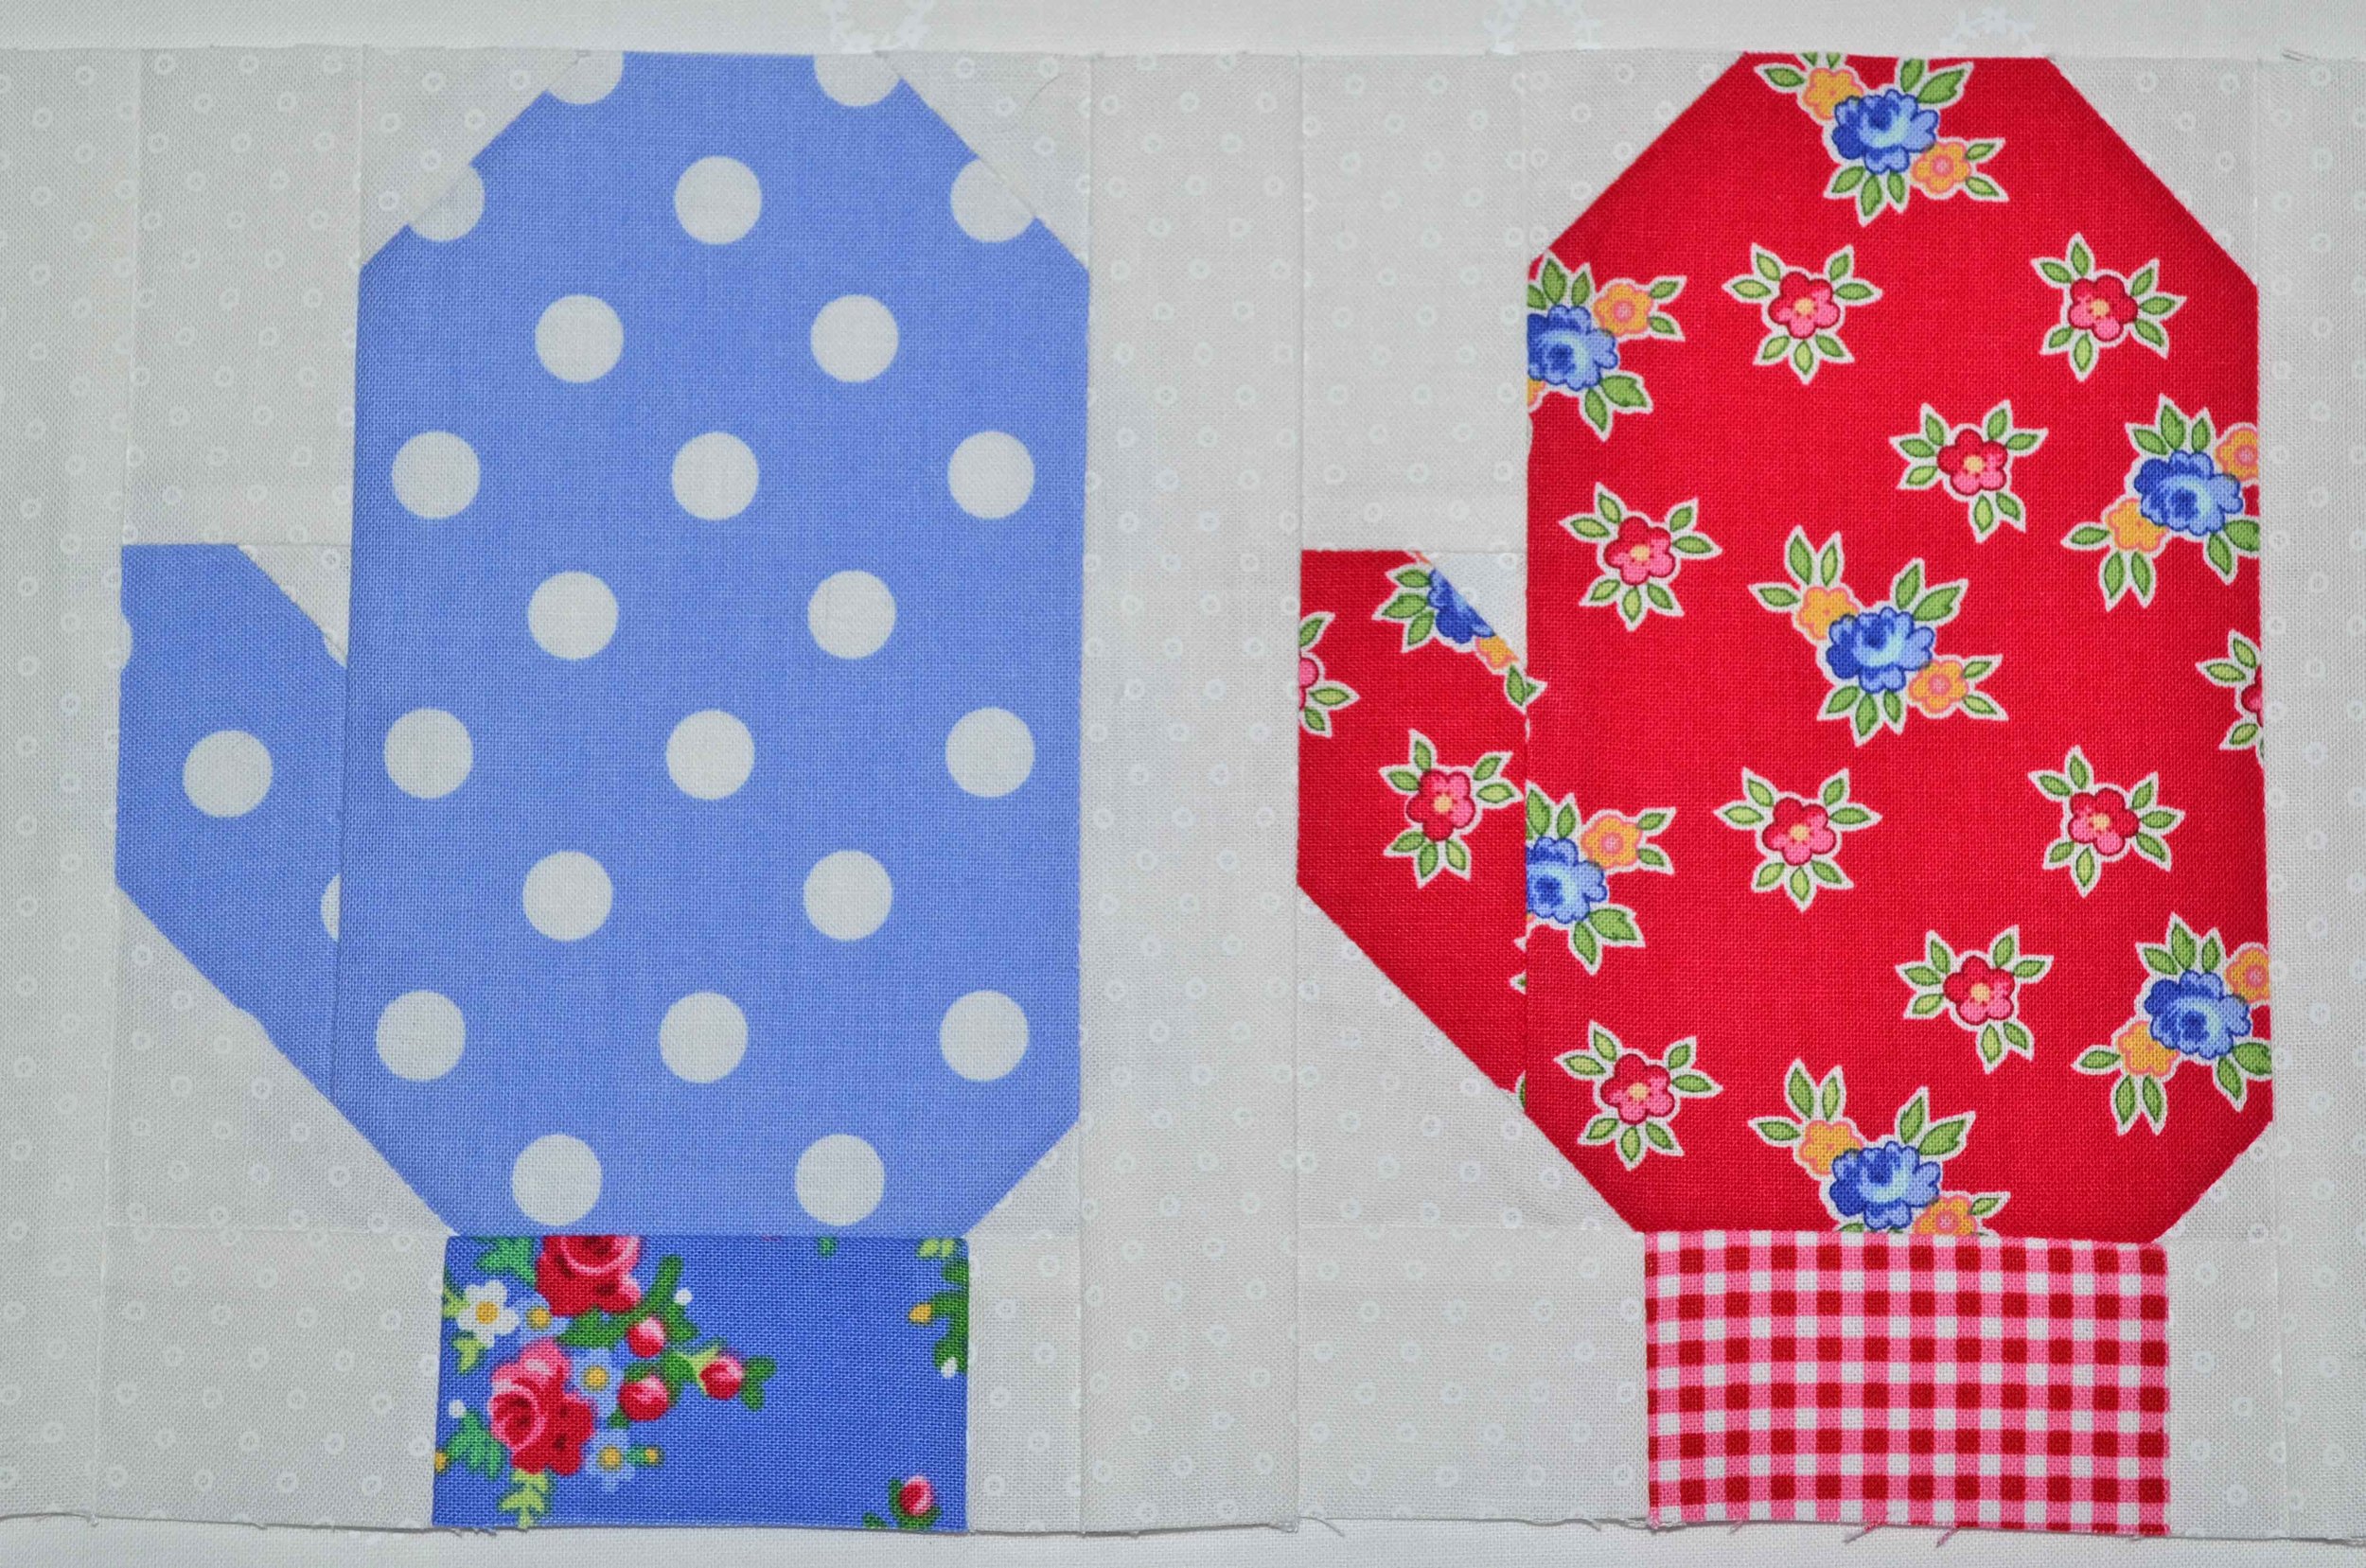
I made mittens this week! Mismatched mittens. 

quilty fun mittens 018.JPG

We're nearing the end of the Quilty Fun sew along. Just a few more weeks to go! I carefully planned my colors for these mittens. There's no pink or grey here because the blocks that go above this strip have plenty of pink and grey.

quilty fun mittens 006.JPG

These were very easy to make, but I probably needed to pay closer attention to the directions. Because otherwise, thumbs can end up in the wrong place. I wonder how I know that! And I can't operate a seam ripper while wearing mittens.

I'm no stranger to these quilty mittens. I've made them twice before. During the holiday break I made a mitten and snowball runner with a bonus pattern from Lori Holt's book. That was in the dark ages before I started blogging. This one is mostly Doodlebug Designs fabric. I like saying that name. Doodlebug. Doodlebug. Doodlebug!

But my first mitten love is always gonna be the original Bee In My Bonnet Row Along from last year. I had so much fun planning out my fussy cutting here. And I feel happy every time I see this quilt.  

In real life I almost never wear gloves or mittens for short runs outside. My fingers get claustrophobic. Yes, my hands get cold. That's what pockets are for! I'll wear them if I'm going to be outside for a long time. And they're certainly handy (haha) for holding onto grimy poles on the subway trains. I even have a pair of vintage designer gloves, and they're in perfect condition. They're brown suede with a cashmere lining. I never wear them because I don't want to mess them up. Crazy, right? I'll use these quilty mittens WAY more than the real thing!

row, row, row along... done!

The Bee In My Bonnet Row Along quilt is done!

bee in my bonnet row along 007.JPG

And freshly out of the dryer! All squishy and crinkly!

bee in my bonnet row along 004.JPG
bee in my bonnet row along 2 012.JPG

This quilt has all of my favorite traditional motifs. Like multicolored apples and crazy flying geese.

bee in my bonnet row along 2 005.JPG
bee in my bonnet row along 2 021.JPG

Happy houses, bright tulips, baskets and butterflies.

bee in my bonnet row along 2 004.JPG
bee in my bonnet row along 023.JPG

I had a major overdose of Flower Sugar here!  Plus the Pam Kitty Morning dotty backing. I still have yards of those dots in my stash - I can never have too many dots! And I love the cross hatched quilting done by Melissa Hoffman.

bee in my bonnet row along 2 022.JPG

There's even a bee label! A big thank you to Lori Holt for providing free patterns for us each week and ultra-clear tutorials. All of these patterns have been compiled into an amazing new book called Quilty Fun

Have you seen the latest Quilty Fun Sew Along? We're only halfway through, so there's still time to join us! Get the scoop here.

bee in my bonnet row along 044.JPG

Thanks for visiting! This is my first link-up with Finish It Up Fridays, sponsored by Crazy Mom Quilts. I need to go check out all the other blogs!